
AI image tools can help create amazing artwork for sublimation blanks, phone cases, mugs, tumblers, DTF transfers, UV DTF decals, apparel and personalised products — but print-ready artwork needs more than a good-looking picture.
This guide explains how to use template sizes, bleed, safe areas, aspect ratio and prompt wording so your artwork is easier to print, press, cut and finish.

The biggest mistake with AI artwork is asking for “a nice image” without explaining how that image will be printed. A mug wrap, phone case, coaster, tumbler, shirt print and UV DTF decal all need different artwork shapes and different safe-area rules.
A square AI image might look great on screen but fail badly on a wide mug wrap. A phone case design may place a face where the camera opening cuts through the artwork. A coaster design may put text too close to an edge where bleed or finishing variation can affect it.
Before generating artwork, check the product’s design size and prompt the AI tool for the correct canvas shape. Keep important details inside the safe area and allow background artwork to continue into the bleed area.
Each printable product has a different design area. Some products are square, some are vertical, some are wide wraps, and some have cut-outs, holes, seams, handles or camera openings.
On Print Geek product pages, many products include design information in the Design tab. This can include the print area, bleed allowance and product-specific notes. Where this data is available, it can be used to calculate a starting artwork size in pixels.
| Product type | Best artwork shape | Important artwork note |
|---|---|---|
| Mugs | Wide horizontal wrap | Keep the main subject centred. Allow extra background near the left and right edges. |
| Phone cases | Tall vertical artwork | Keep faces, logos, text and focal points away from camera-hole areas and outer edges. |
| Coasters | Square or round-safe artwork | Allow bleed around all edges. Avoid thin borders and text near the finished edge. |
| Tumblers | Wrap, tall or tapered template | Use extended backgrounds. Check seam areas and template shape before printing. |
| Shirts and apparel | Centred vertical or square-style design | Use bold artwork. Avoid tiny text and details that may not print clearly. |
| Keyrings and small blanks | Simple centred artwork | Small details, faces and thin text may become hard to read at finished size. |
| DTF transfers | Depends on final print size | Use transparent backgrounds where required and avoid unnecessary rectangular backgrounds. |
| UV DTF decals | Depends on decal shape | Keep cut lines, white ink needs and small detail limitations in mind. |
Aspect ratio means the shape of the image — how wide it is compared to how tall it is. A square image, a wide mug wrap and a tall phone case are completely different artwork shapes.
If the AI tool generates the wrong shape, you may need to crop, stretch or rebuild the design. Cropping can remove important details. Stretching can distort people, pets, logos, text and artwork.

Good for many coasters, square panels, small signs and some centred artwork designs.
Better for mug wraps, tumbler wraps, banners and landscape product templates.
Better for phone cases, plaques, vertical signs, apparel fronts and portrait layouts.
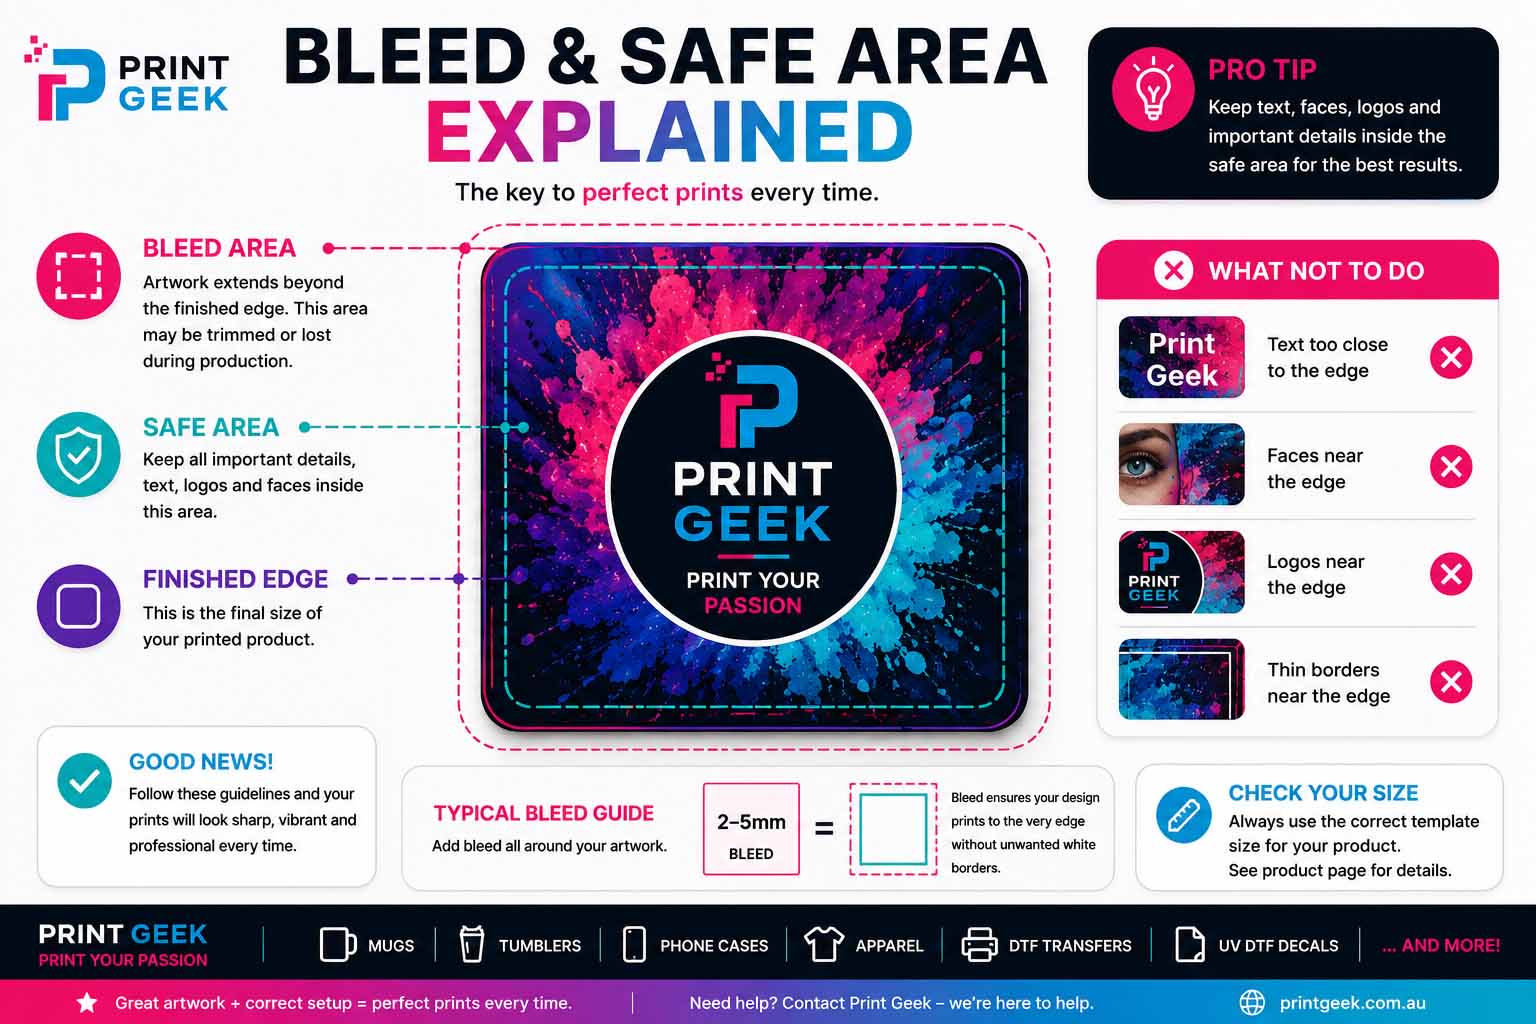
Bleed is extra artwork that extends past the final visible edge of a product. It helps avoid white edges, awkward gaps or visible alignment issues when a product is printed, pressed, trimmed, wrapped or finished.
The safe area is the inner part of the design where important content should stay. Names, faces, logos, QR codes, thin borders, important product details and small text should not sit close to the outer edge.
The outside artwork area that may be trimmed, wrapped, hidden, pressed around an edge or slightly lost during production.
The inner area where important text, logos, faces and focal points should remain.
The approximate final visible edge of the product after printing, pressing, trimming or finishing.
Many print templates are measured in millimetres, but AI and design tools usually work in pixels. For high-quality print artwork, 300 DPI is a common working standard.
The result is usually rounded to the nearest whole pixel. Some AI tools may not export the exact requested pixel size, so the final file should still be checked and corrected in design software before printing.
A good AI artwork prompt should include the product type, final artwork size, layout, style, colour direction, bleed instructions, safe area instructions and anything the AI should avoid.
For many products, you should ask for flat artwork only. This means you want the artwork file itself, not a product mockup, not a photo of a mug, not a phone case preview, and not a design shown in perspective.

Create print-ready flat artwork only for a wide horizontal mug wrap. Use a seamless tropical sunset background with palm trees and bright flowers. Keep the main scene centred and leave extra background space on the left and right edges. No text, no logos, no mockups, no mug photo.
Create print-ready flat artwork only for a square sublimation coaster. Use colourful floral artwork with a soft background pattern extending to all edges. Leave the centre clear for text to be added later. Keep important details away from the outside edge. No text.
Create print-ready flat artwork only for a vertical sublimation phone case. Use a bright abstract watercolour background. Keep faces, names, logos and important subjects away from the outer edge and away from the camera area. No mockup, no phone outline, no template lines.
Create a centred print-ready front design for apparel. Use bold high-contrast artwork, clean edges and readable spacing. Transparent background if required. Avoid tiny text and overly fine details. Do not generate a shirt mockup.
Create a clean sticker-style decal design with bold shapes and clear edges. Keep fine details readable and avoid tiny disconnected pieces. Leave any required logo or text area blank for manual editing later.
Create a high-resolution apparel transfer design with a transparent background. Use bold printable artwork, strong contrast and clean edges. No shirt mockup, no background rectangle and no fake garment texture.
AI tools are known to make mistakes with text. They can misspell names, distort letters, invent words, change dates, add random characters or make text look correct at first glance when it is actually wrong.
For personalised products, business merchandise and customer artwork, this is a major risk. Names, phone numbers, quotes, dates, memorial wording, business names and logos should be checked carefully.
Names, dates, quotes and business details must be manually checked.
AI may create logo-like marks that are not the real customer logo.
For best results, generate the artwork without text and add wording manually.
Zoom in and check the final file, not just the AI preview.
Even with a detailed prompt, AI tools may not follow every instruction perfectly. The final image may be the wrong size, the wrong aspect ratio, include unwanted borders, add fake text, place important details too close to the edge, or create a mockup instead of flat artwork.
Do not assume the artwork is print-ready just because it looks good. Before printing or supplying artwork, open the final downloaded file and check it properly.
Confirm the artwork is the required width and height in pixels. Resize or rebuild the canvas if needed.
Make sure the design shape suits the product. Avoid stretching artwork to force it into a template.
Confirm faces, names, logos, QR codes and text are not too close to edges, seams, cut-outs or holes.
Use this checklist before sending artwork for printing, pressing, cutting or production.

The artwork matches the required product print size or has been prepared to fit it correctly.
The artwork shape suits the product, such as wide wrap, square, portrait or centred apparel design.
Background artwork extends into the bleed area where required.
Important text, faces, logos and focal points are away from risky edges, seams, holes and cut-outs.
The file is flat artwork only, not a product photo, template preview or perspective mockup.
Names, dates, business names, quotes, phone numbers and spellings have been checked.
The image is sharp, clear, not watermarked and large enough for the print area.
People, pets, logos and artwork have not been stretched to force the image into the template.
You have permission to use supplied images, logos, characters, artwork and brand elements.
The downloaded/exported artwork has been checked, not only the AI preview screen.
AI tools can create artwork that looks similar to famous characters, brands, logos, movies, games, sports teams, celebrities or artist styles. That does not automatically make the artwork safe to print or sell.
Only use artwork, logos, photos and brand elements you have permission to use. Avoid asking AI to copy a specific brand, character, celebrity, artist, movie, game or trademarked design unless you have the appropriate rights.
These links can help you choose products, check printable blanks and understand related print workflows.
AI is a powerful starting point, but the final file still needs the correct size, shape, bleed, safe area and production checks before it is ready for printing.